MORNING STAR OBSERVATORY
  • Home
    • About
    • Contact
  • Astrophotography
  • The Observatory
    • The New Observatory
    • - About the ExploraDome
    • - About the Lancaster Dome
    • - Building the Lancaster Dome
  • Equipment
    • CCD Cameras >
      • Orion Starshoot Pro
      • QSI 683WS
      • ZWO ASI-178MM
    • Eyepieces
    • Filters
    • Mounts >
      • Orion HDX-110 (EQ-8) >
        • New HDX-110 Setup
        • Orion HDX110 EQ-8
    • Observatory Computers
    • Telescopes >
      • Astro-Tech AT6RC
      • Celestron C-11 XLT
      • Zhumell 152mm Refractor
  • Projects
    • Arduino Focuser
    • C11 XLT Mods
    • Orion SSPRO Camera >
      • Disassembled Views
      • Noise Reduction Mod
      • Temp Controller Mod
    • Ultima 8 Mods
    • Zhumell Refractor Mods
  • Non-Astronomy
    • Amateur Radio >
      • Boat Anchor Radios >
        • BC-348N Receiver
        • Collins 51J4 HF Receiver
        • R-392 HF Receiver
      • DIY >
        • Station Boom Microphone
      • Ameco >
        • Ameco AC-1
        • Ameco OCM
        • Ameco PT-2
        • Ameco R5A
      • Heathkit >
        • Heathkit SB-102 Station
      • Knight-Kit >
        • Knight Kit Span Master II
      • Yaesu FT-817 >
        • Yaesu FT-817ND
        • LDG Z-817 Autotuner
        • Windcamp LiPo Battery
    • Antique Radios >
      • Building A Radio Workbench
      • Radio Dial Neon Clock
      • Radios >
        • 1938 Zenith 6-S-254
        • Echophone EC-1
        • Eltz Radione 2
        • Panasonic RF-5000A
        • Silvertone Model 4465
    • Geiger Counters >
      • AN/PDR-27G Radiac Set
      • Lionel CD V-700 Geiger Counter
      • RCA WF-12A Geiger Counter
    • Test Equipment >
      • DIY Test Equipment >
        • DIY Curve Tracer
        • DIY Signature Tracer
      • Military Test Equipment >
        • BC-221-AF Frequency Meter
        • LM-21 Frequency Meter
        • TS-323/UR Frequency Meter
        • TS-465 C/U Sweep Generator
        • TS-505D/U VTVM
        • TV-3C/U Tube Tester
      • Tube Testers >
        • Alternating Current Sink
        • Drug Store Tester
        • EMC Model 200 Tube Tester
        • Hickok Model 6000A Tube Tester
        • Hickok OZ-1 (550X)
        • Precise Model 111 Tube Tester
        • Precision Model 10-12
        • Supreme Model 385
        • TV-3C/U Tube Tester
      • VTVMs and Multimeters >
        • B&K Model 290 Hi-Low FET Multimeter
        • Hickok 225K VTVM
        • McMurdo Silver VOMAX 900
        • Micronta 22-220 FET Multimeter
        • Simpson 360-2 Digital FET DMM
        • TS-505D/U VTVM
      • Hickok >
        • Hickok 19X RF Generator
        • Hickok 225K VTVM
        • Hickok 288X RF Generator
        • Hickok OZ-1 (550X)
        • Hickok 6000A Tube Tester
      • Simpson >
        • Simpson 360 DMM
        • Simpson 360-2 DMM
        • Simpson 480 Genescope
      • Supreme Instruments >
        • Supreme 385 Automatic
        • Supreme 560 Vedolyzer
        • Supreme 560A Vedolyzer
        • Supreme Model 561 AF/RF Generator
        • Supreme's Model 562 Audolyzer
        • Supreme Model 562 Audolyzer circa 1941
        • Supreme Model 562 Audolyzer circa 1946
        • Supreme Model 563 Audio Generator
        • Supreme Model 576 RF Generator
      • Other Test Equipment >
        • Heathkit IT-28 Capacitor Tester
        • Rider 162 Chanalyst
        • Tektronix 326 O'scope
        • VU-Data Model 941B Oscilloscope
    • ---------------
    • Fossils
    • Rocks and Minerals
    • Star Trek >
      • Star Trek Rock Mood Lamp
      • Star Trek Communicator

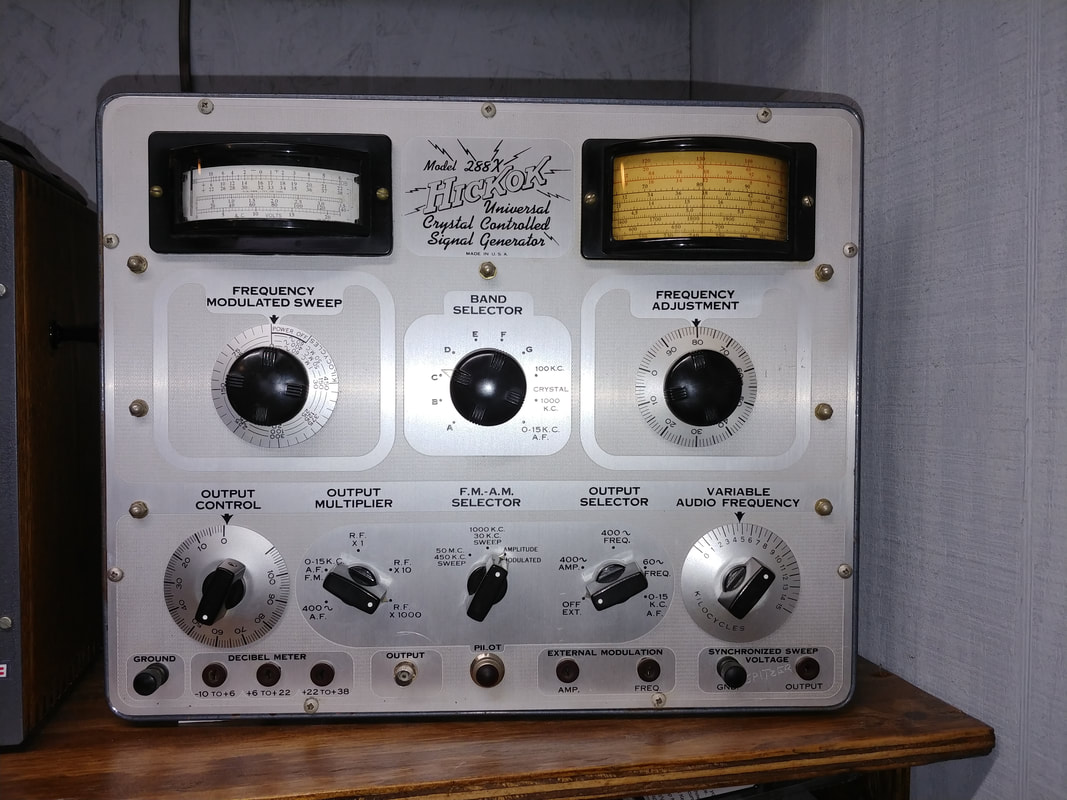
Restoring a Hickok 288X / TS-465 C/U RF Sweep Generator

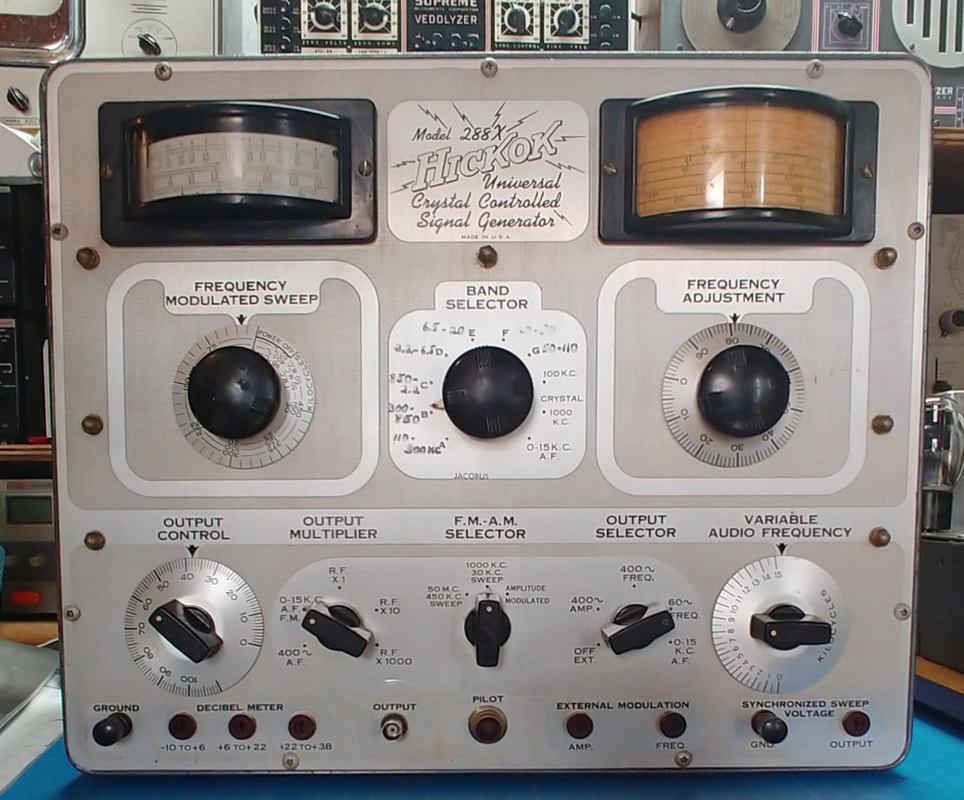
This Hickok 288X is in good condition, just a bit dirty and covered in the usual cigarette smoke residue. The cabinet has some paint loss and scratches, but the front panel controls are smooth, nothing is missing and it should make for a fun restoration.

Picture
Picture
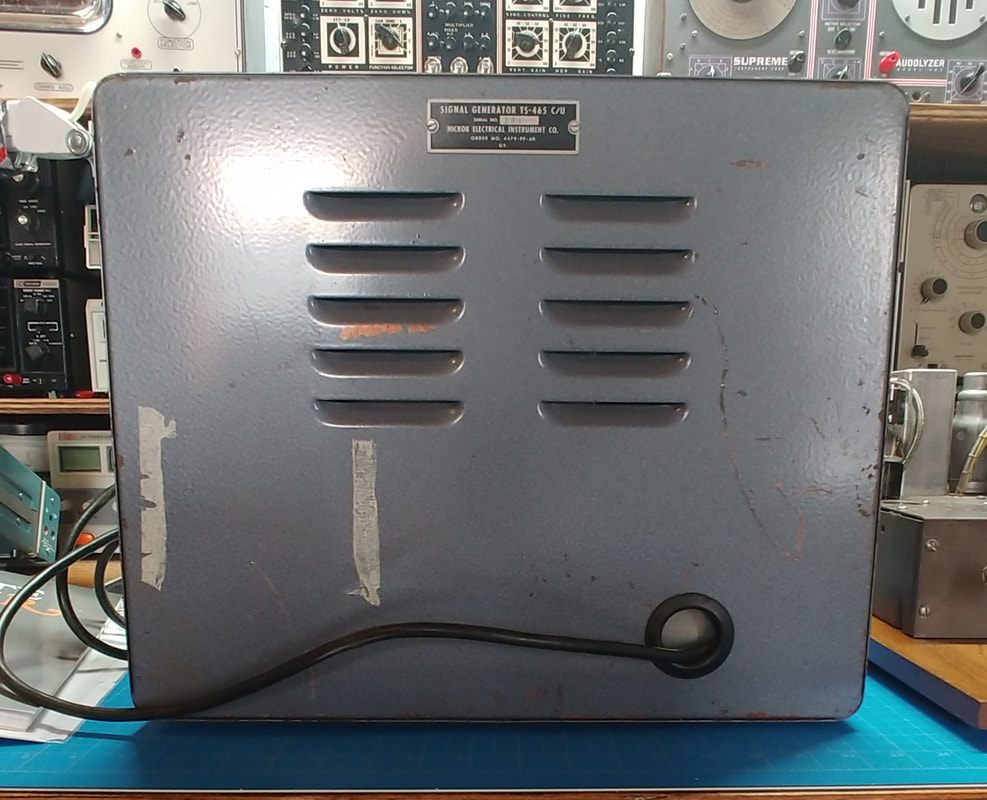
Front and rear of the generator. Some scratches and tape residue on the cabinet but nothing too terrible. And the worst I see on the front is some writing with a permanent marker, a couple of small scratches, and a former owner has engraved his name into the panel. Why do people do that, was he planning to take it with him when he died?

Picture
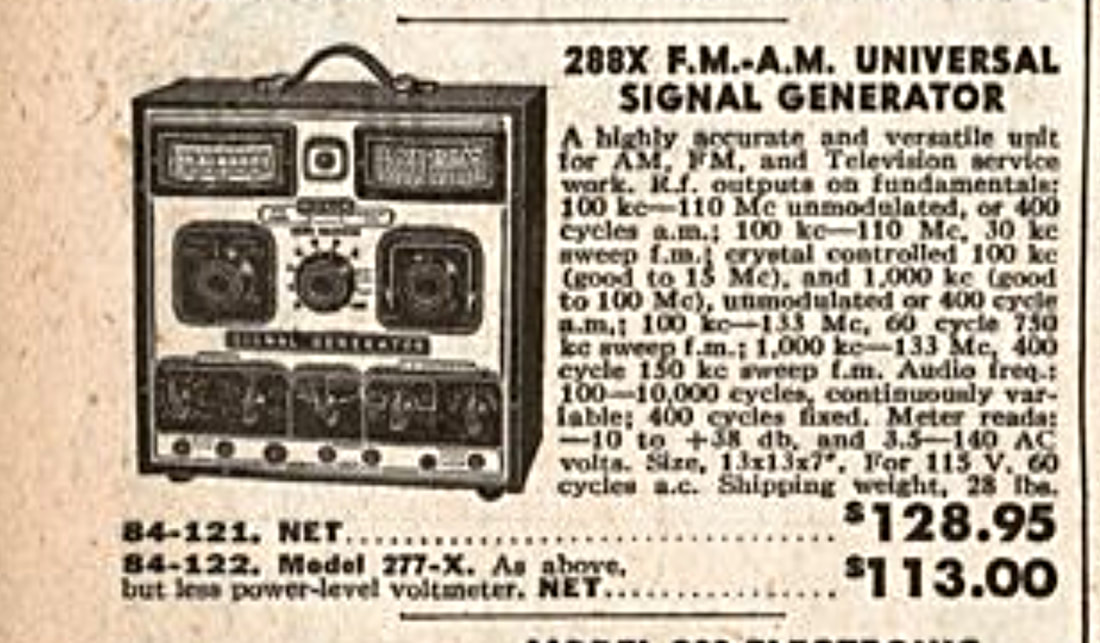
This 288X ad is from a 1946 Allied Radio catalog advertised at $128.95. It's the oldest reference to a 288X that I could find.

Picture
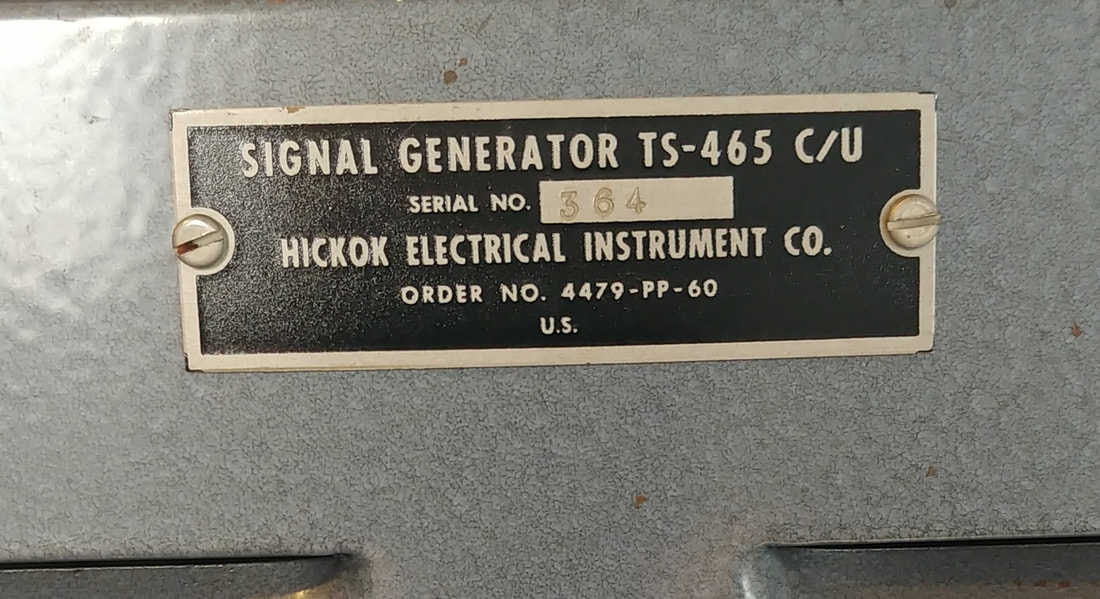
This 288X was made for the military and is designated as the TS-465 C/U. There were A, B and C models over the years with various differences. If I'm reading the contract order number correctly it indicates this one was made in 1960, or sometime thereafter, so the 288X was in production, in one form or another, for at least 15 years. Not a bad run for a signal generator originally designed at the end of WWII.

Picture
Picture
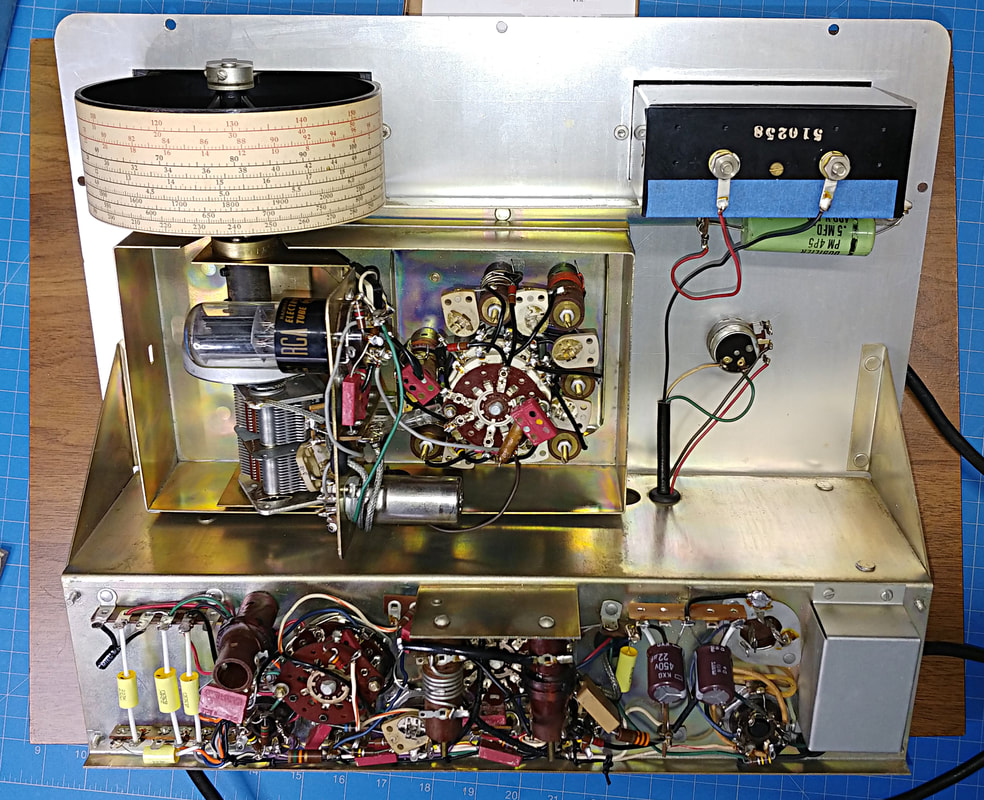
I'm happy to see the inside is very clean and so far everything appears to be original. Doesn't look like any untrained hands have been in this one. The green on the panel is just light reflecting off it.

Picture
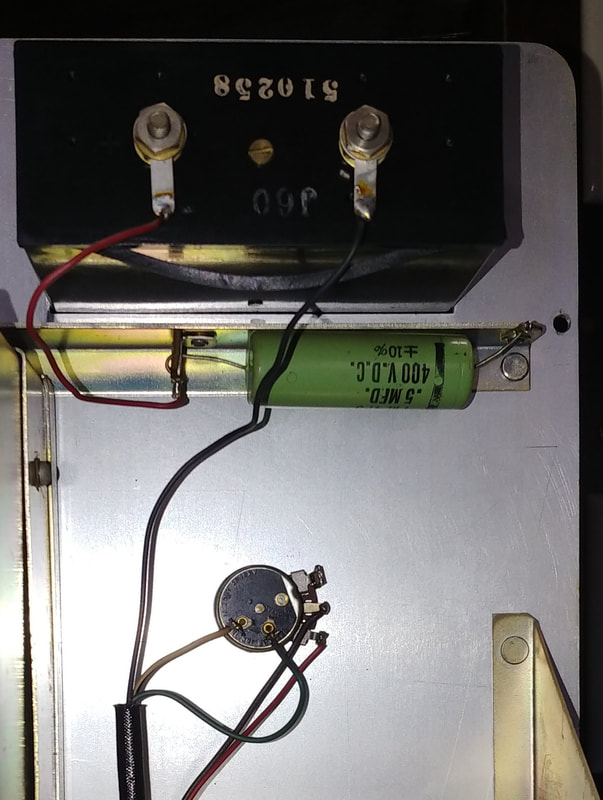
This is the back of the front panel on the meter side, and shows an original green encapsulated capacitor, part of the dB meter circuit. Most likely it's paper and foil and will need replaced, but it will get checked first, along with all the rest.

The gasket is protruding from the rear of the meter. After working it back in its groove I placed a piece of tape over it to keep it there. I really don't want to open the meter without good reason. There is a copper oxide rectifier inside, but the meter tests fine so there's no need to open it. Actually I suspect the gasket hanging out probably means someone has already been in there and changed it.

Picture
Picture
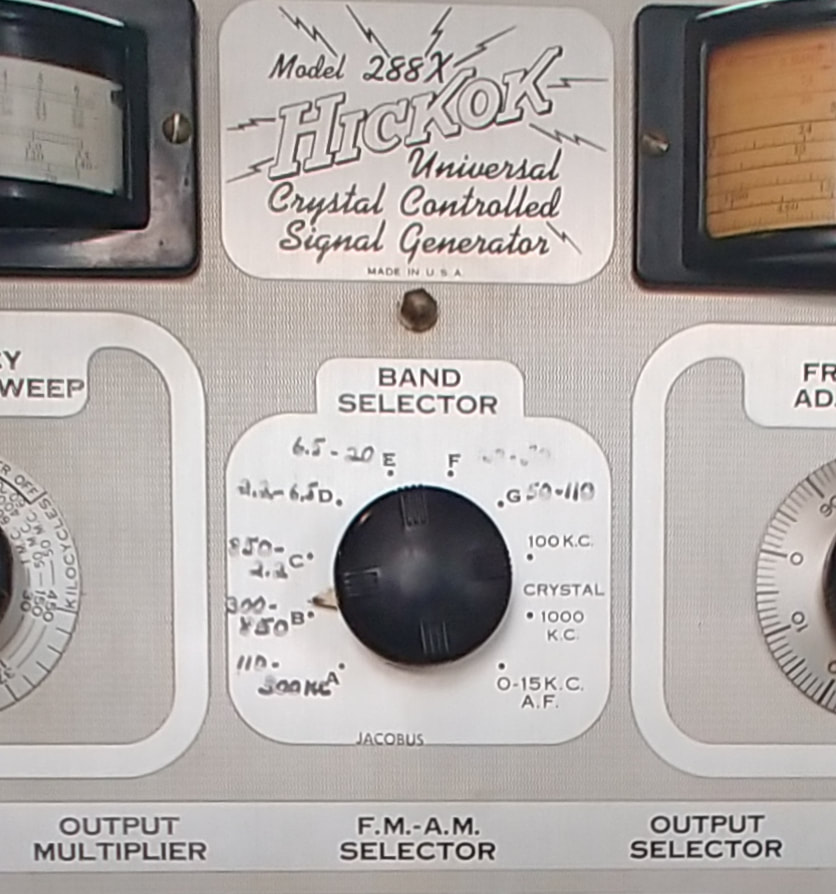
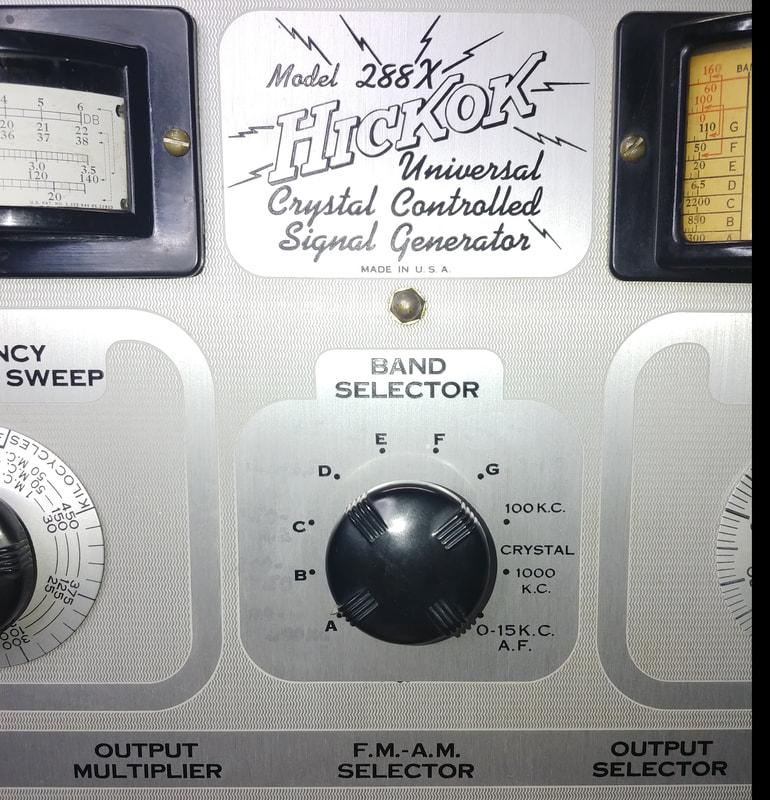
I want to remove the handwritten frequency ranges on the Band Selector dial. I wouldn't mind them so much if they were neatly done, but they're not. It took some testing to find the right chemical, but acetone did the trick, applied with Q-tips. Now there are only ghostly vestiges of the ink and I'm going to leave well enough alone at this point rather than risk marring the panel trying to get those ghosts off. They'll probably fade away in time anyway.

Picture
Looking inside after removing the shields I did find one place where someone was definitely using a soldering iron, but I don't see any components that appear to have been replaced.

The AC power line filter is under the small box on the bottom right. And there are six capacitors across the chassis that could be paper, plus a 10uf electrolytic on the cathode of the BFO and the two 20uf power supply filter caps that need replaced due to age. But all the resistors I've checked are either in tolerance or very close. The out-of-tolerance 10% ones might be 11-12% now and the 5% ones are maybe 6%. So I don't think any will need changed and I'll see how the generator works first. This unit has obviously been in a climate controlled environment most of it's life.

Picture
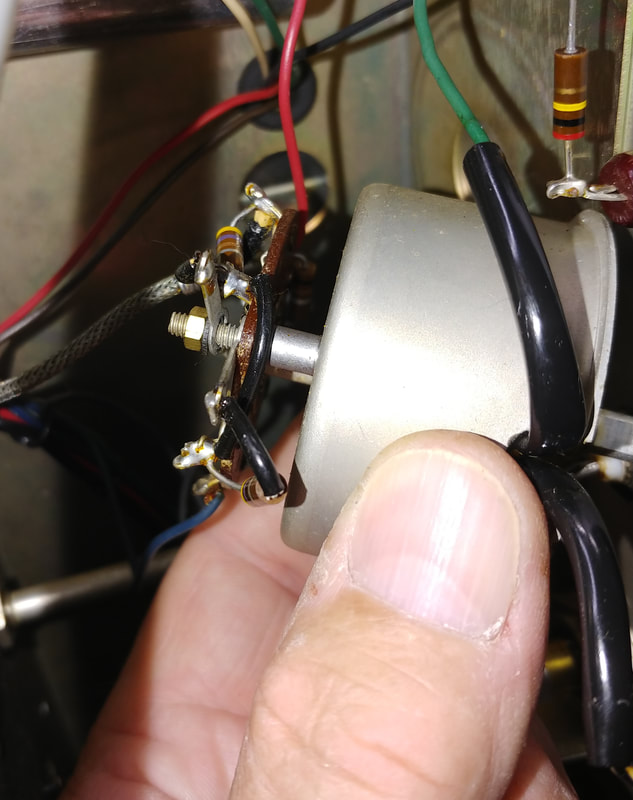
Someone resoldered the wire tap on the coil and melted the spaghetti insulation while they were at it. Sloppy but not hard to fix. I wonder what they were trying to do?

I also found while checking capacitors on the bottom left of the chassis that it looks like a couple of them had one end unsoldered for testing at some point in the past.

Picture
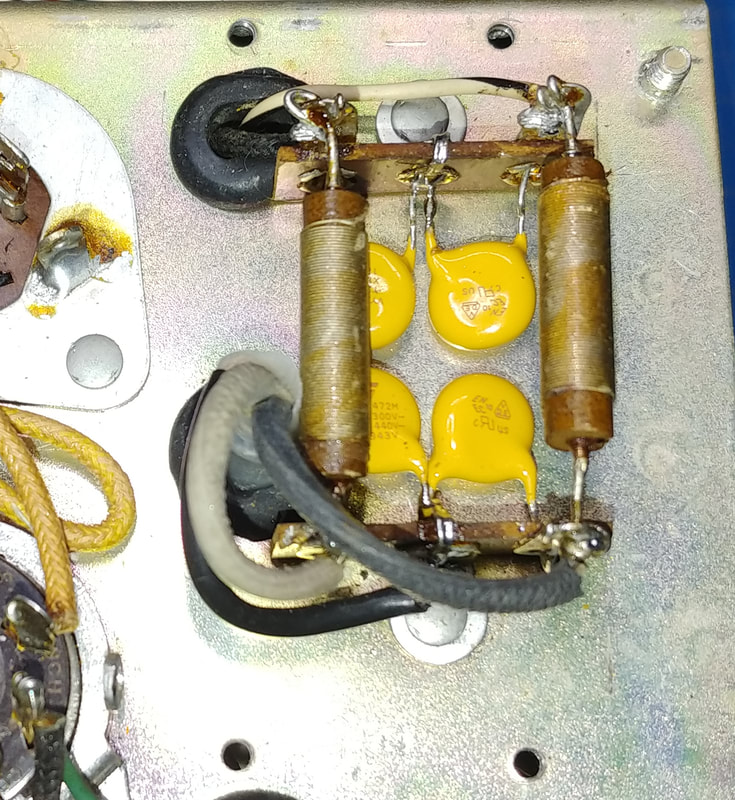
The power line filters. The power cord line and neutral were attached at the bottom of the coils where I snipped the wires, but the shield was not attached to anything. The schematic shows it grounded so I'll fix that, too. The four mica capacitors in the filter probably should be replaced with modern X1Y2 safety capacitors.

Picture
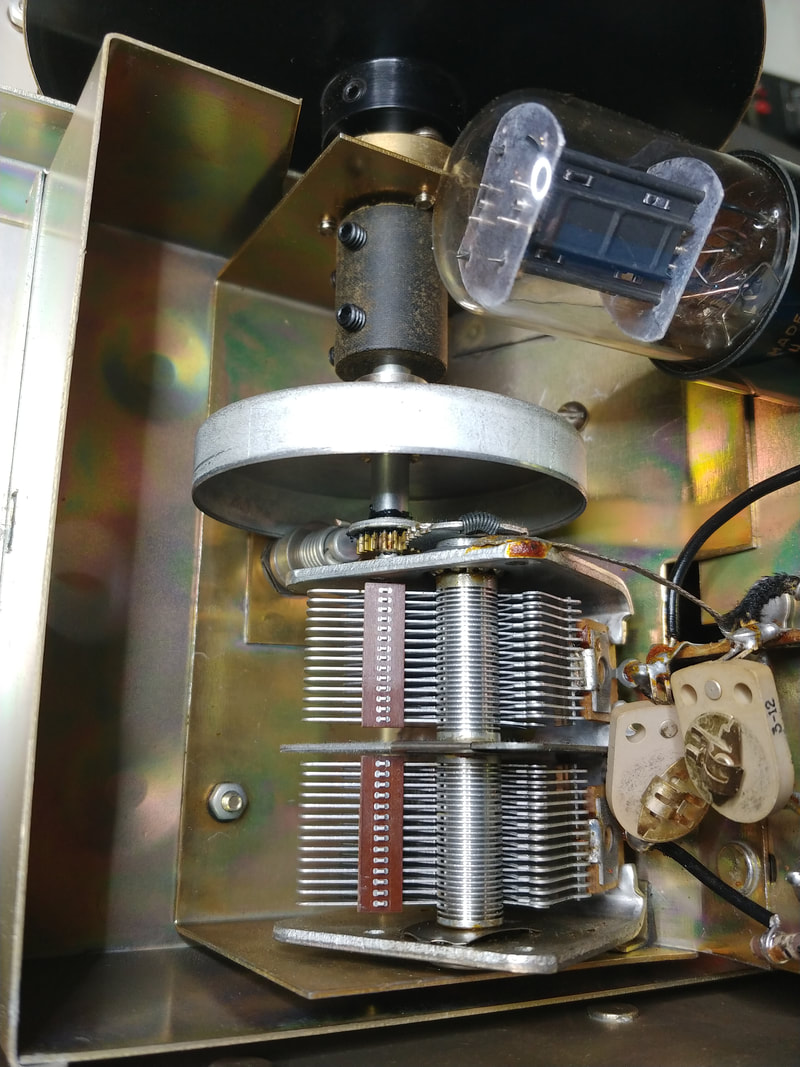
The drive for the tuning cap is a pinch type. The pinch roller is engaged, and after cleaning the old grease off the gears and relubing, it works fine.

Picture
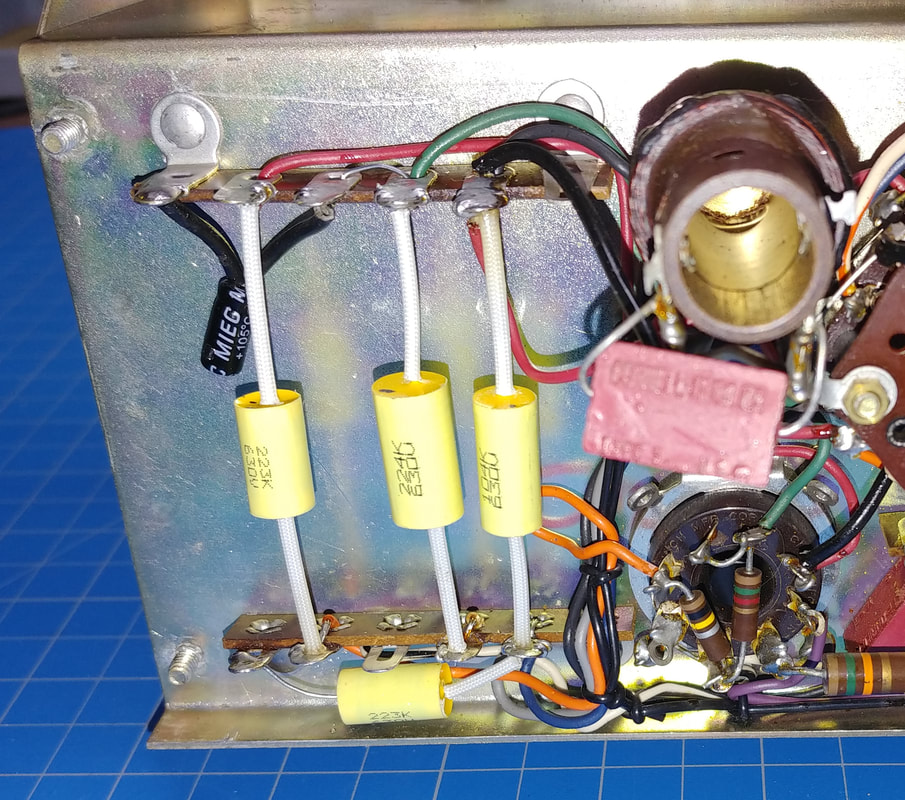
The old paper caps have been replaced. They were all rated at 400 volts but none of them got past 150 volts on the leakage test of my Heathkit IT-28 capacitor checker. One Astron capacitor didn't even make it past 50 volts. But to my surprise the big green Cornell Dublier 0.5uf capacitor connected to the meter circuit passed with flying colors. It's a PM series capacitor, which I couldn't find any info on at first, but figured it must be a film cap. I finally did find that the PM series are molded mylar caps, so it stays.

Picture
There was a factory hole already punched in the chassis near the power supply filter can that was perfect for mounting a terminal strip for the new filters.

Picture
The power line filter mica caps have been replaced with X1Y2 caps. The caps were still good, but not safety rated for use across the AC line.

I had cut off the cracked power cord, but it's a shielded cord and to replace it I'd have to find some shielded cable to make a new one. And after cutting it off I discovered the inner conductors are actually in quite good condition and it's only the outer rubber that's a problem. So I treated it with rubber conditioner and trimmed the cracked end off and now it looks good enough to reinstall. I also soldered the power cord shield to one of the filter's terminal strip ground lugs.

Picture
Picture
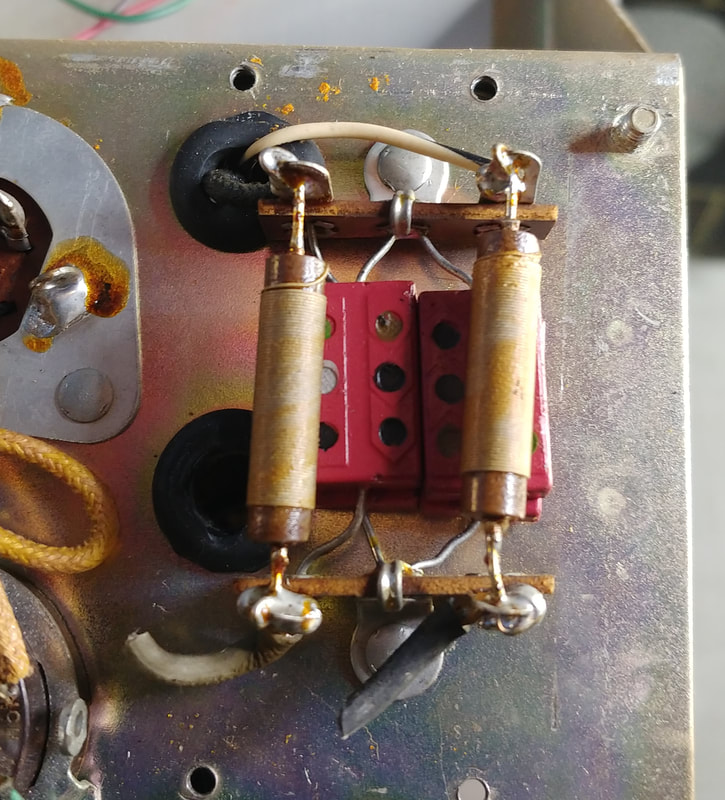
Resistance measurements were off in the attenuator, so I disassembled it to pull the front wafer out of it's shielded enclosure. The 470 ohm resistor is discolored and measures 735 ohms now. It's been overheated so I guess someone didn't pay attention to the caution note about this in the manual. If connecting a 288X to a point with DC voltage present, it needs a DC blocking capacitor in series with the output lead to prevent overheating the generator's attenuator resistors.

Picture
I checked all the tubes as I finished up and noticed they all test very strong and all the metal ones have the same 6035 date code. This makes me think the tubes may be original from the factory and that this unit does not have a lot of time on it.

Now the shields need to be reinstalled so the calibration can be checked. The only sign of rust I've seen anywhere inside is just on the toothed washers under the screws and nuts that attach the shields, so I'm replacing them with stainless steel.

Picture
Aligning Bands A thru D was fairly straight forward and none of the bands were very far out. I used my frequency counter to do the adjustments, adjusting the coil core at the low end and the trimmer capacitor at the high end. After alignment all the dial readings I checked were less than 500 Hertz off, and most were less than 100. And after only about five minutes warm up the oscillator is very stable.

The RF output on the top end of Band E, and on Bands F and G, were too low for my frequency counter, but I was able to finishing aligning Bands E and F using my LM-21 frequency meter. I wasn't able to find harmonics for the alignment points on Band G so I purchased a TS-323 frequency meter, which has a frequency range from 20MHz to 450MHz, and will recheck bands F and G with it.

Page created 9/14/2020
Last edit 10/24/2020
Powered by Create your own unique website with customizable templates.
  • Home
    • About
    • Contact
  • Astrophotography
  • The Observatory
    • The New Observatory
    • - About the ExploraDome
    • - About the Lancaster Dome
    • - Building the Lancaster Dome
  • Equipment
    • CCD Cameras >
      • Orion Starshoot Pro
      • QSI 683WS
      • ZWO ASI-178MM
    • Eyepieces
    • Filters
    • Mounts >
      • Orion HDX-110 (EQ-8) >
        • New HDX-110 Setup
        • Orion HDX110 EQ-8
    • Observatory Computers
    • Telescopes >
      • Astro-Tech AT6RC
      • Celestron C-11 XLT
      • Zhumell 152mm Refractor
  • Projects
    • Arduino Focuser
    • C11 XLT Mods
    • Orion SSPRO Camera >
      • Disassembled Views
      • Noise Reduction Mod
      • Temp Controller Mod
    • Ultima 8 Mods
    • Zhumell Refractor Mods
  • Non-Astronomy
    • Amateur Radio >
      • Boat Anchor Radios >
        • BC-348N Receiver
        • Collins 51J4 HF Receiver
        • R-392 HF Receiver
      • DIY >
        • Station Boom Microphone
      • Ameco >
        • Ameco AC-1
        • Ameco OCM
        • Ameco PT-2
        • Ameco R5A
      • Heathkit >
        • Heathkit SB-102 Station
      • Knight-Kit >
        • Knight Kit Span Master II
      • Yaesu FT-817 >
        • Yaesu FT-817ND
        • LDG Z-817 Autotuner
        • Windcamp LiPo Battery
    • Antique Radios >
      • Building A Radio Workbench
      • Radio Dial Neon Clock
      • Radios >
        • 1938 Zenith 6-S-254
        • Echophone EC-1
        • Eltz Radione 2
        • Panasonic RF-5000A
        • Silvertone Model 4465
    • Geiger Counters >
      • AN/PDR-27G Radiac Set
      • Lionel CD V-700 Geiger Counter
      • RCA WF-12A Geiger Counter
    • Test Equipment >
      • DIY Test Equipment >
        • DIY Curve Tracer
        • DIY Signature Tracer
      • Military Test Equipment >
        • BC-221-AF Frequency Meter
        • LM-21 Frequency Meter
        • TS-323/UR Frequency Meter
        • TS-465 C/U Sweep Generator
        • TS-505D/U VTVM
        • TV-3C/U Tube Tester
      • Tube Testers >
        • Alternating Current Sink
        • Drug Store Tester
        • EMC Model 200 Tube Tester
        • Hickok Model 6000A Tube Tester
        • Hickok OZ-1 (550X)
        • Precise Model 111 Tube Tester
        • Precision Model 10-12
        • Supreme Model 385
        • TV-3C/U Tube Tester
      • VTVMs and Multimeters >
        • B&K Model 290 Hi-Low FET Multimeter
        • Hickok 225K VTVM
        • McMurdo Silver VOMAX 900
        • Micronta 22-220 FET Multimeter
        • Simpson 360-2 Digital FET DMM
        • TS-505D/U VTVM
      • Hickok >
        • Hickok 19X RF Generator
        • Hickok 225K VTVM
        • Hickok 288X RF Generator
        • Hickok OZ-1 (550X)
        • Hickok 6000A Tube Tester
      • Simpson >
        • Simpson 360 DMM
        • Simpson 360-2 DMM
        • Simpson 480 Genescope
      • Supreme Instruments >
        • Supreme 385 Automatic
        • Supreme 560 Vedolyzer
        • Supreme 560A Vedolyzer
        • Supreme Model 561 AF/RF Generator
        • Supreme's Model 562 Audolyzer
        • Supreme Model 562 Audolyzer circa 1941
        • Supreme Model 562 Audolyzer circa 1946
        • Supreme Model 563 Audio Generator
        • Supreme Model 576 RF Generator
      • Other Test Equipment >
        • Heathkit IT-28 Capacitor Tester
        • Rider 162 Chanalyst
        • Tektronix 326 O'scope
        • VU-Data Model 941B Oscilloscope
    • ---------------
    • Fossils
    • Rocks and Minerals
    • Star Trek >
      • Star Trek Rock Mood Lamp
      • Star Trek Communicator